Showing posts with label Sewing and DIY. Show all posts

Sunday, December 27, 2015

Sewing Diary: Upcycling and U.F.Os!

Cutting out the top only of Butterick 5917
Over my winter break, I decided I wanted to clear out a small box of U.F.Os (unfinished objects) and upcycling projects I had set aside for - like -  years! In the past, these have not turned out very well, because I am trying to piece together bits and pieces, and make do, with less than optimal results. So we'll see how this goes. My first project was to take this black cotton knit skirt that I bought several years ago, but was too small for me. I didn't want to just give it away, though, because I am in love with the applique.

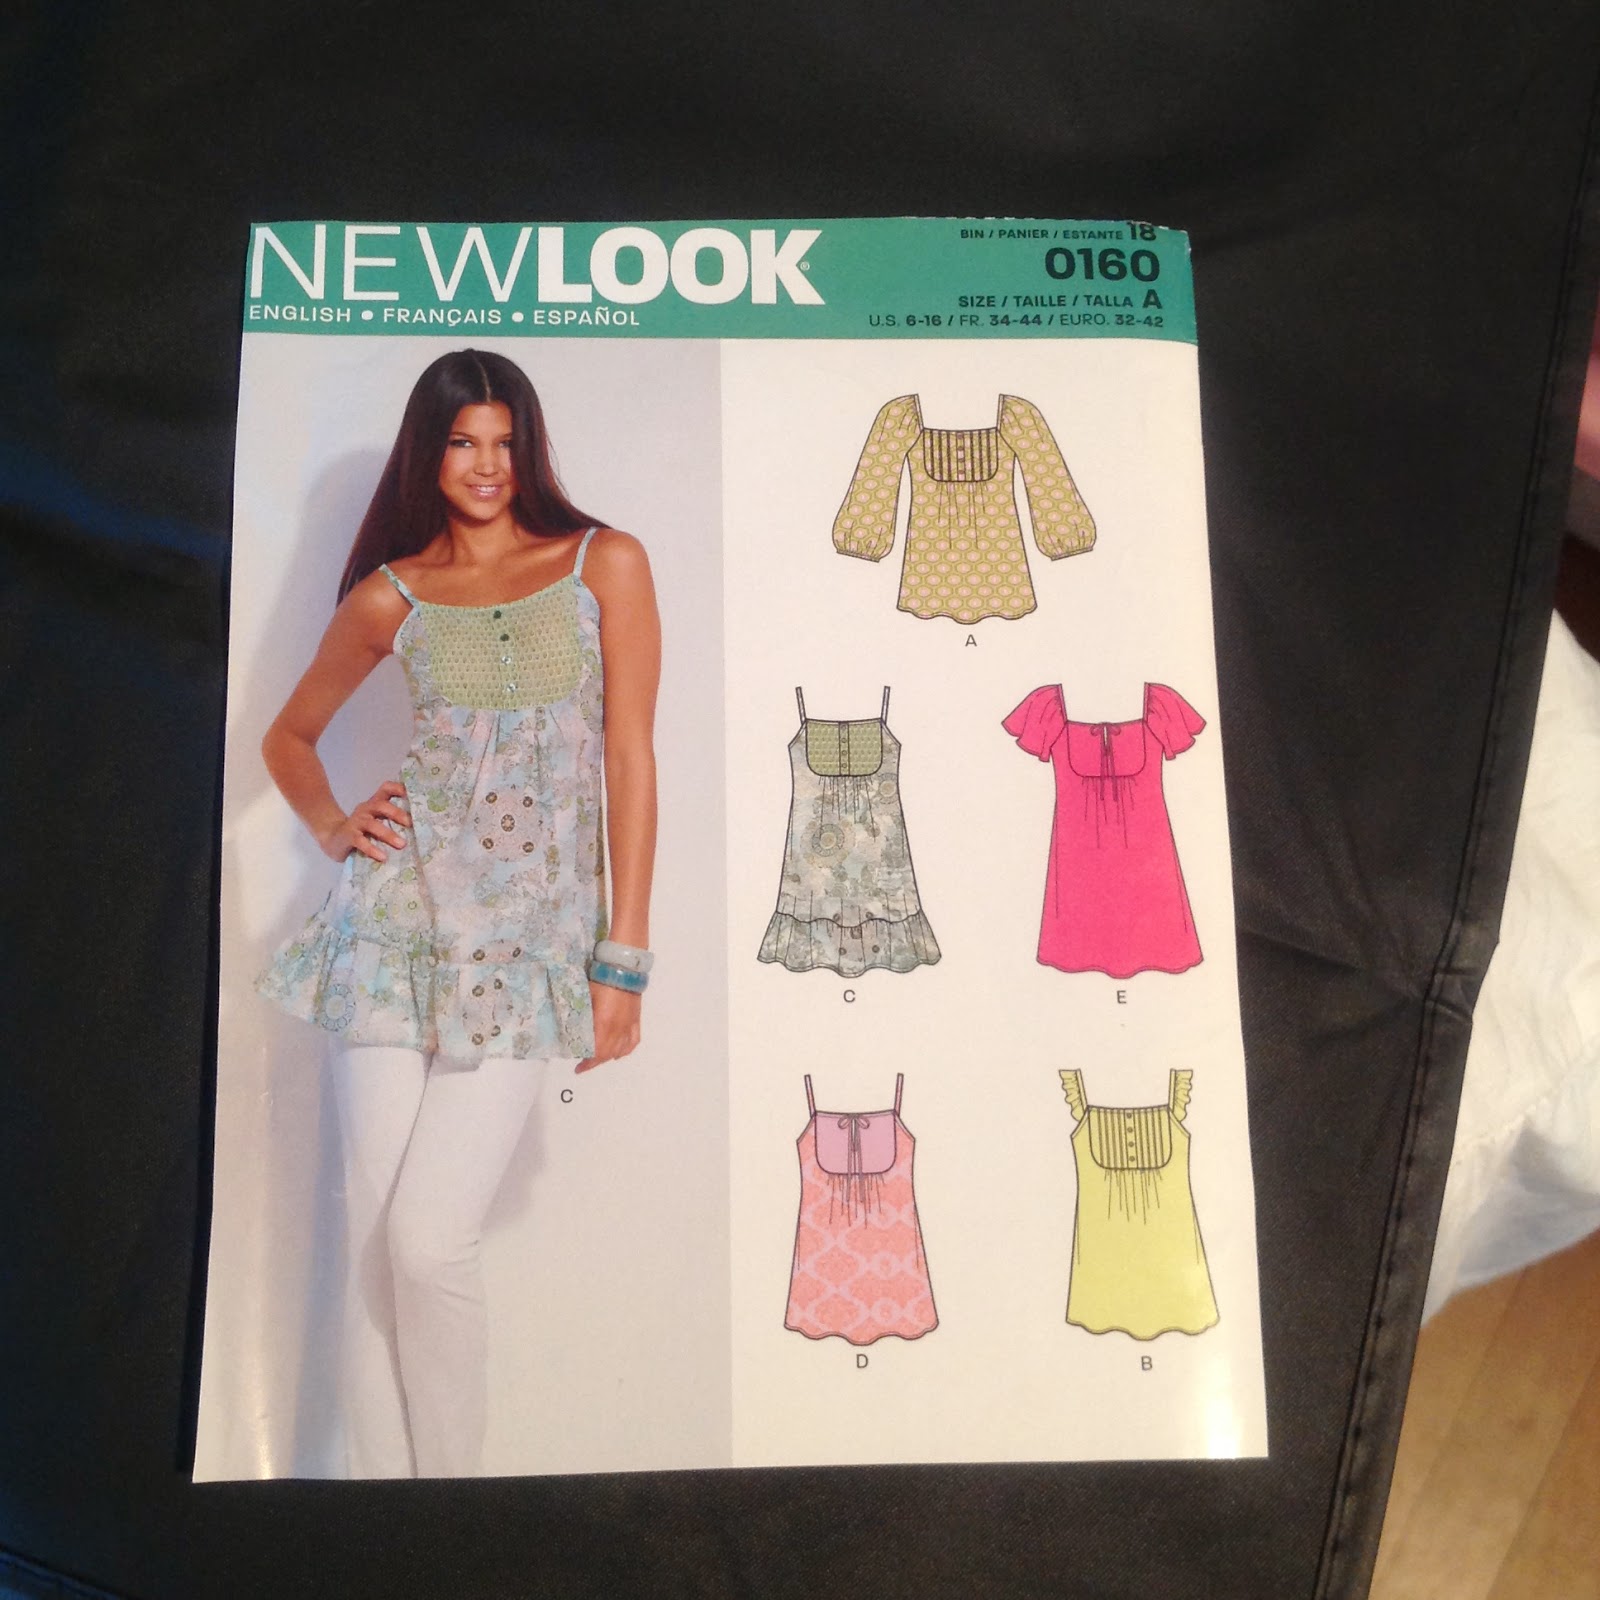
So I had removed the waistband, and decided to get some black cotton knit fabric and turn the skirt into an empire waist knit dress. My underbust area (where an empire silhouette would emphasize) is smaller than my waist so I moved the waist up there, and chose a commercial pattern for the top.

I had never used this pattern before so I did not know how it would fit. In addition, it is made for wovens, so I thought I had better size down, since I am using a knit. Anyone who sews a lot will hear warning bells going off: risky business #1: using a pattern for the first time without understanding how it will fit. Risky business #2: using a pattern meant for woven fabrics with knit fabrics. Regardless, I trudged ahead. I did not have to spend any money on this because I already had the pattern and the fabric in my stash.

What attracted me to this sewing pattern was the empire waist, the pretty ruffles around the neckline, and the fact that the neckline had a piece of fabric across the middle to make it not low cut. Of course, this piece of fabric was not high enough for me, and it was still low-cut on me - showing a decent amount of cleavage - but that's my life! I have such a high bust shelf, or maybe it's a short waist? In either case, almost everything except turtlenecks are low-cut on me!

I did not do any modifications on this pattern. I simple cut out the top, but in two sizes smaller than the pattern recommended, to make up for using knits instead of wovens. In case you didn't know, that is because you don't need the same amount of wearing ease with knit fabrics as you do with woven fabrics.

As far as design changes, there was supposed to be an opening in the back, but again, since I was using a knit fabric, I didn't need that because the lower neckline meant the dress could just go on over my head. 

The laying and cutting out of the pattern was pretty simple. There were not very many pieces, and it went quickly. The construction was also simple. I would call it "advanced beginner," so just a notch above beginner. My only real mistake was not stay stitching around the neckline, because it really stretched out and became floppy. Additionally, I was going to make this dress sleeveless, so that I could wear it year round just by adding or subtracting a cardigan on top. However, there were big gaps in the armholes, which means I should have done a Full Bust Adjustment. So I couldn't leave it sleeveless, and had to add short sleeves. So I laid out the fabric again and used the short sleeve pattern.
This will be really pretty on someone who isn't me.
All in all, I think it came out attractively, BUT I am not going to keep it. Yep, this one's being sent to Goodwill. (sad face). My issues are in the fit: the neckline is too big, gapey, droopy and low cut. And the skirt, even moved up on my body to a smaller part, is still too tight. Therefore, with the top being too big and the bottom being too small, it will never, ever fit me. So this was an upcycling fail, but as always, I try to focus on it as a learning experience. Better luck next time, and maybe I should stick with patterns I've had some experience with.

Monday, August 31, 2015

Sewing Diary: Re-making a Skirt to My Taste

A few months ago, I began to lust for novelty border print skirts, due mostly to seeing them everywhere on blogs and Instagram. In that period of lust, I bought this skirt by Sourpuss Clothing. And it wasn't cheap, either!
The original skirt that I purchased.
As soon as I received it, though, I was disappointed. The waistband was pleated, but in a really sloppy way that made it bulky, wrinkled and twisted. The zipper was put in wrong, with the top of it exposed on the inside, instead of hidden in the waistband. The printing seemed like it would fade really quickly after a few washes, and the skirt was pretty short, as well. I almost returned it, but I really wanted a novelty print border skirt, and I did like the print on this one. So I decided to remake it a bit.
The skirt with the waistband removed, the loose trim and the fabric about to be cut.
I removed and threw away the waistband and the zipper. I bought one yard of good quality black Kona cotton fabric, and used that to make a new flat, correctly installed waistband. I also put in a new zipper, in the correct way. Then I added a ruffle to the bottom of the skirt so it had more swish, and was a comfortable length for me.
How I would style this skirt.
The final change was to add some emerald green vintage fringe that I had on hand, to really add to the playfulness of this skirt. I was going to add it to the hem, but then I realized that since the black ruffle I added was dyed black, and the black on the original skirt was printed black, they would fade differently with every wash. So I added the green fringe between the two blacks to distract from how they will fade.

I am very happy with the result and love how no one else with have this skirt exactly like I do.

Sunday, August 30, 2015

Sewing Diary: Vintage Sleepwear Pattern to Modern Sundress

I've had a lot of frustrating sewing experiences lately. A new apron pattern I tried turned out ugly, so I tossed the finished product. And then I tried to make a flounced skirt using some beautiful raw silk in grey and silk noil in blue that I had previously made into a shapelessly ugly skirt and a boxy and wrinkly tunic top. I just adore both of these fabrics but I can't seem to make anything nice out of them. This was my fourth try with these fabrics and it was another failure. The skirt got stretched out along the hem so there was unattractive puckering and in general, the new skirt was just as blah as the other items I had previously made with these fabrics. So they were again relegated to my remnant pile and I hope to make something really beautiful out of them some day. Does anyone else out there have fabric they just love, but have never successfully turned in to a wearable garment? Please share so I won't feel so lame.

But I did have one project turn out very nicely this week. I wanted to make a sundress that was loose and flowy and would work as both a swimsuit cover up and a nightgown, and possibly, a sundress for when I take my trip to the Greek isles in September. I am planning on taking only a carry-on bag, so am trying to minimize the clothes I need to carry.

When visiting Textile Discount Outlet last week to use up my Groupon certificate, I found this really pretty, lightweight fabric that I think is rayon (almost nothing is labeled in that store). It is white and various shades of blue, and has the loveliest drapey hand. So soft! I am trying to keep my wardrobe for my trip in blue and white, so I knew this would be perfect. I bought 3 yards and the whole thing only cost about $13.

I decided to try out this vintage pattern I had purchased on ebay for the dress. I liked that there was no waistline, which would work great both as a nightgown and as a swimsuit cover up. When I am in Mykonos, my hotel will be directly across the street from the beach, so I can wear this to walk to the beach and not feel so naked. The other thing I liked about this pattern were the ruffled sleeves, which is a style I adore. So cute!
Where the pins are, that is where I had to handsew to attach the lining at the armholes and to the skirt.
This pattern is a vintage size 16, which is about a 12 in modern sizing, and was too small for me, but it was a cinch to grade up. I just added a couple of inches to the width of the dress part, which are simple rectangle shapes. Then I made a muslin for the bodice, and saw that I only needed to add a couple of inches in width, because the styling of the dress features lots of ease and is supposed to be loose.
Adding width to the bust area without compromising the fit in the neck and armholes.
Above is a photo of the way I altered the bodice pattern. It seemed to work well, and, although there was a lot of handsewing involved in attaching the lining on the inside, I am very happy with the way this dress turned out. I know I will enjoy wearing it. Plus I love any kind of nautical prints, and I think this one is very sweet. Can't wait to try it out in Greece!
My finished sundress/nightgown/beach cover-up

Monday, July 20, 2015

Sewing Diary: Three Projects That Came Out Great!

As anyone who sews clothing for herself knows, a lot of projects don't come out that well, and are either abandoned midway through production, or donated/discarded in the end. But these three projects came out great, so I am posting them to keep a record of the things I sew throughout the year.


Prairie Skirt: styled
This first one used up some Pacific Northwest Coast Native American-style printed cottons that I had collected a few years back. I had originally thought about making a quilt, but after making a tie quilt for my Dad for his Christmas gift last year, I decided quilting wasn't for me.


Any way, I found this skirt pattern that was perfect for using a variety of print fabrics. The pattern was very simple. I didn't not make any changes to it except to make it a bit shorter, because I am on 5'2" tall. Very quick, very easy, and I love the skirt. Designs that can fit me and look good through changes in weight/size are very much appreciated. I also like that, although this skirt has an elastic waist, the pattern is cut so that there is not a lot of bulk around the waist. One for the win!

Whimsical sundress with vintage fabric
For this sundress, I used some vintage 80s fabric from my stash that my mom had actually bought a long time ago, and gave to me. The fabric is pretty thin and see-through, which is not the best, but I just loved the colors and the Art Deco-influenced border print. It just screamed, "Make me into a sundress!" So I did.

Simple pattern that's actually for nightgowns


I used this very simple pattern. The only adjustments I made were to turn the straps into ties (which I love and think are so cute), and to do an FBA.

An FBA that worked except for it lengthened the side seams
I struggled to find a online tutorial for an FBA for an empire waist top without darts, so I just winged it. I know it's not right, because it made the side seam way too long, but I made it work somehow, and it actually fits great.

Styled with a tank top and some bright beads

Used orange jumbo rickrack on the seams of the front panels, and lime green cotton medium rickrack along the hem.
For this skirt, I used some really cute novelty print quilting cotton called Science Fair by Robert Kaufman, and a variety of rick rack scraps I had in my stash. I freakin' love rick rack! All sorts of pleasant 1970s nostalgia connotations for me. The skirt was a pretty simple six gore.


The changes I made to this really old pattern I had in my collection were to add some width around the hips, and to move the zipper to the center back seam, instead of having it on the side seam. I really dislike side seam zippers because they always make me feel fussy and bulky in the hip area. Any way, I love this skirt, and but I have to find some top to wear it with.... I might get this sweater. Still thinking on that one....

Wednesday, June 17, 2015

Sewing Diary: Pink Gauze Swing Dress

I have had a lovely few yards of dusty pink crinkled cotton gauze in my fabric stash for a few years, so since the weather is now summery, I decided it was time to use it up. I leafed through my collection of drawings and clippings for ideas on what to make with it, and came up with this design for a loose-fitting flowing dress:

Pink Gauze fabric and my dress design.
Because the shape was so simple, I did not use a pattern for this. I just drew my shape with a Sharpie marker and a yard stick onto the fabric and cut it out. I also made neck facings, and some very slim spaghetti straps. Speaking of skinny straps, I highly recommend this tube-turning tool. It makes strap-making as easy as pie!
Here are my homemade spaghetti straps, ready to be threaded through the casings.
Neck facing about to be attached.
This gauze fabric does stretch quite a bit while it's being handled, but for this design, it didn't matter too much. Usually though, I would have stay-stitched the neck and armholes to avoid the stretch.
The finished product.
This dress did not take me very long, and I am pretty pleased with how it came out. As you can see, the hem isn't Exactly how I planned it - the pointed are on the sides, instead of in the front, but I still like it. The only other negative is that the fabric is really sheer, so it won't really work as a dress, but I can wear it as a swimsuit cover-up or as a nightgown. I am in love with this shade of pink, the two rows of gathers at the neck and the straps.

Thursday, January 29, 2015

Fewer words: Will it equal my posting more?

I don't post as often as I'd like on this blog and one of the reasons is that it is kind of daunting to do all that writing. So I am going to experiment with writing many fewer words per blog post and see if that helps me post more often. Here is my latest sewing project. Made this for myself - I have a life long love of yellow summer dresses, pintucks and flutter sleeves. This is made of a really pretty 100% cotton pale yellow dotted swiss. It's the Real Dotted Swiss with woven-in cotton tufted "dots", not the crappy modern version with synthetic flocked dots printed on.


I used this pattern from New Look.

I chose the size 16, and then did my usual alteration to the pattern of making it an A-line for my extra large bottom half.

I love the way this turned out. I had to double the fabric for the body because the fabric is so sheer, and that took a little of the flowy-ness away from it, but it does make it more wearable. It would have been too see-through if left unlined, for me to feel comfortable wearing. Can't wait for warmer weather to wear it!
 photo signature_zps90694f0b.png

Wednesday, November 12, 2014

Sew Cute! Sew Comfy! Foxy Mini Dress (or Tunic)

I just can't get enough of cute fabric, and when I saw this fox print knit, (in either grey or blue background, from GirlCharlee.com), I knew I had to have it asap! I find sewing with knits both easy and challenging at the same time. They are easy because you don't have to worry about finishing seams or any unraveling, but they are hard because the fabric can stretch out of shape so easily, both when cutting and when stitching them up. Because of that, I try to keep the lines of any garment I sew with knits very simple and plain. Lots of straight-line sewing.
Beautiful medium-weight cotton jersey and adorable foxes!

When I received this fabric in the mail, I washed it up in hot water and dried it on "normal" setting to get as much shrinkage out before I cut it. I was a little nervous to cut into it because I liked it so much, and there is always that fear in the back of my mind that I might make a mistake while sewing, and "ruin" it. But with a deep breath, I forged ahead and decided to use this Burda Style pattern 7354 from my stash. I actually created a "Frankenpattern" by using the higher-waisted design of View B, but adding a casing like in View A. I look best in high or empire waistlines, and look dreadful in low or dropped-waist designs. But I didn't want to use a straight View B because it doesn't really have a waist: that's just a self-fabric belt tied under the bust, which looks sloppy to me. And View A has the casing on the inside of the garment, and then you create buttonholes in the top and the drawstring is threaded out through the buttonholes. Well, I hate making buttonholes, so I switched that up, too.


I don't know what it is, but I love designs with fabric gathered by drawstrings. I decided to make it tunic length. I wear yoga pants or leggings constantly and am always in need of tunic length tops to go with them. It is long enough, though, that if I wore opaque tights, it could also be a mini dress (because I am that short).

This is the first double-needle hem that I have ever tried on knitwear.
I did not have to do my normal Full Bust Adjustment with this pattern because of the large amount of design ease built in to the top, so I went with my high bust measurement of 40" and made it a size 18. Another alteration I did to the pattern was to make the skirt part of the tunic an A-line shape by pivoting the pattern outward from the waist. I do this to almost all skirt patterns I work with because I am so pear shaped, with a waist that is usually 3-4 sizes smaller than my hips.

The double-needle stitching on the hem makes it look really professional!

Here is the gathering on the shoulder seam, using a self-fabric drawstring that I made.

Here is the casing that I created and sewed to the waistline.

Another pattern change I made was to creating a casing with the fabric, and pin it to the waistline on the outside. This was tricky because since there was no waist seam, figuring out exactly where to pin the casing was challenging. I tried measuring up from the hem to keep it consistent, and then tried it on and adjusted it a little bit to suit my body shape. 
In my messy sewing room. This even fits my size 12 dress form! The drawstrings make it very size-adjustable.

And here is the finished tunic! I am in love with how it has turned out and I have worn it several times already, though it probably won't get much wear this winter. The sleeve and shoulder gathering make it only a three-season (spring, summer, fall) top because it is basically sleeveless, and the voluminous fabric would not fit, or be all bunched up, if I tried to wear a cardigan with it. Regardless, I am really pleased with how this turned out.

 photo signature_zps90694f0b.png


Saturday, October 11, 2014

Treasures Purchased at the Brooklyn Flea and That Too-Small Vintage Skirt

I didn't purchase too many things at the Brooklyn Flea market, mostly because I was concerned about getting them home in my luggage, but also because the prices seemed a little high. But I did come away with a few treasures:
Native American Print Prairie Skirt
From a vintage clothing booth, I picked out this fantastic maxi skirt. On me, it comes to just above my ankles and has three gathered tiers, plus it opens with buttons down one side. The generous elastic waist means it fits me just fine, even though it is not a plus size. It's made from a medium weight quilting cotton, and has fantastic colors. I am a sucker for full red maxi skirts. They just seem so romantic. I've already worn this skirt several times. Love! Talked the seller down from $20 to $18 for this skirt.

From the same seller, I also picked out this handmade A-line skirt with a fantastic 70s or 60s style print in psychedelic colors. I think the fabric is polyester or a blend, which I usually shy away from, but it feels nice and not tacky.
Fantastic colors!
The only problem with this skirt is the tiny 26" waist. Amazingly, I used to have a 26" waist, but that was MANY years ago. But fortunately, this skirt was apparently made for a slim and VERY tall lady. On me, it came to the floor, so I bought it anyway even though it was too small, knowing that I could alter it to fit. Once I got home, I removed the waist band, and down from the waist about 3"  to get a new waistline that would fit me.
Slightly sloppy hand stitching told me this was homemade long ago.

This photo shows the zipper and waistband removed.

I measured down from the waist about 3" all the way around and marked my new cutting line.
I also had to remove the zipper, then reinstall it lower on the skirt, starting at my new, larger waist opening. Then using some scraps of lime green cotton fabric that I had laying around, I traced the new waist opening and created facings. I decided to face the waist opening instead of adding a new waistband to make the skirt more modern and sleek, with less bulk at the waist.
New waist facings created out of scrap cotton fabric.
After reinstalling the old zipper, I attached the new facings (to which I had ironed on some lightweight interfacing) and voila! I now have a really cool, really colorful, retro-look A-line maxi skirt (the length now comes to my lower calf). Cost was $18.
Shown on my dress form. (She is taller and slimmer than me - that's why the waist is a bit low on her).


My next purchases that day were from a great booth that had a variety of vintage items and reasonable prices. They were very busy and doing great business. For no reason other than it was cool, (and I really don't know what I will do with it), I bought this pair of vintage pinkers.
"The Florian Pinker Pinks As It Rolls"
Aren't they the coolest? I seriously had never seen anything like them before. I guess they are the precursor to today's pinking sheers, and are used to finish hems after sewing so that the fabric doesn't fray. I love the box design, as well. It says they never need sharpening, and sure enough, they do still work. They are a bit heavy and stiffer to use than my modern shears, but are so neat, nonetheless.

When I got home, I did some quick internet research and these have been reintroduced and are currently being manufactured by the Overall Company in Oregon! The new version costs $77.50. I love it when things are actually made in the U.S. It's so rare these days. I also saw several vintage ones that have sold on ebay for between $7 and $40. I paid $18, so I guess it was a fair price, but I could have gotten them for less. Of course, it was not the sort of thing you go looking on ebay for because I didn't even know I wanted it until I saw it.

Finally, my last purchase of the day from the Brooklyn Flea Market was from that same great booth. Again, I didn't really NEED this item, but I love it anyway. I have a small collection of brass animals on my fireplace mantel and this one was a nice bargain (also $18! Everything I bought that day was $18). And it was unique and pretty. Brass animals are trendy right now. I used to think they were tacky but now I love them!
Pretty brass birdies.
I love the rocky stand that the branch is stemming from. I love the smoothness of the brass on the birds' bodies. It's just very nice, overall. One of my favorite brass animal statuettes that I own, and a real bargain. They are selling for much more on etsy right now.

Overall, a modest but nice haul of treasures from the Brooklyn Flea. I highly recommend that you experience it if in the neighborhood. A great outing!

Tuesday, August 12, 2014

My First Time: Making a Full Bust Adjustment (FBA) on a Camisole Pattern

I've been sewing my own clothes since I was in high school (a long time ago now), but sometimes I feel like my skills have not progressed very much, and I'm in a point of stasis, stuck at mediocre. However, I recently happened across a sewing blog that talked about the "Full Bust Adjustment" and although I now vaguely remember doing something similar way back in fashion design school, apparently it had been erased from my conscious memory. So this is why none of the tops I sew seem to fit me satisfactorily! I thought they were just poorly designed patterns or that my body shape was too unusual to fit any commercial patterns. That's the fatalist, nothing's-ever-perfect side of my personality peeking through.

For those sewists that haven't heard of it, the Full Bust Adjustment (FBA) is a pattern adjusting technique for any woman who is larger than a B cup. Commercial pattern makers assume that the average woman is a B cup, and patterns are created with this assumption in mind. But if, for instance, your bust measurement is 45" and you choose a pattern sized for that bust measurement, it may be too big for you in the armholes, neckline, shoulder width, etc., if you are a C cup or greater. So the trick for a better fitting top is to measure your high bust (the tape measure is pulled tight around your chest just under your armpits), and use the pattern size that corresponds to that measurement. I was about to make a summer sundress in a neat navy and white tropical print, but have had trouble in the past with this type of top fitting well. It's usually too short to fit over my bust, but then too loose at the side seams and gaping.

I won't detail the process because there are so many other websites that do a great job with that. For instance, check out these two:
Sewing Lingerie Myself

Sew Sew Sew Your Boat

But suffice to say, that I am pleased with the final outcome on this sundress. I could have added even a little more length in the bust area, as it's still a little short (and on an unrelated note, the straps are too long on my shoulders). But overall, it's a good fit. Here is the finished garment, and below that, a picture of the second full bust adjustment I did, with even better results.

Full disclosure: I am not this slim. I had to pin the dress on my size 12 mannequin to make it fit.
For this dress, I used a gorgeous galaxy print woven cotton. I was going to make a hem that dipped in the back, but chickened out and went more conservative. I haven't worn this yet, but the fit is amazing. Very fitted in the chest area, which makes it very flattering, just right in the waist, comfortable in the hips. Also like that this is not too low cut, so it could be worn for work or family get-togethers. Shout out and thank you to all the sewing bloggers who have put up their FBA techniques to share with everyone and help me advance to a slightly higher level of sewing competence.
Galaxy print cotton dress.
http://static.artfire.com/uploads/product/8/358/42358/5342358/5342358/large/mccalls_5315_misses_dress_sundress_sewing_pattern_size_4_6_8_10_12_c7df674e.jpg
This is the pattern I used.